Intro To Foundry Module Development
Getting a FoundryVTT module off the ground is wonderfully easy, thanks to its reliance on widely used web technologies and good documentation from both official and community sources. However, the official starting point is (by design) a very minimal implementation, without hooks into the modern web-dev toolchain.
foundry-module-ts-template is a FoundryVTT module starting point that includes:
- Typescript, for static typing
- Vite, a modern bundler with excellent performance and a wide array of plugins
- SCSS, for custom styling that's a bit more ergonomic than vanilla CSS
- Automated publishing via Github Actions for push-button distribution
We're going to walk through how I built it, so if you're just starting out on your Foundry development journey, this should give you a good introduction to the basic concepts of FoundryVTT modules and a solid foundation to build your own module on.
Background
One of our core principles in designing our upcoming product, Campaign Composer, is providing for integrations with the wider RPG ecosystem, and it didn't take long to decide which one to start with. Foundry Virtual Tabletop (sometimes just "Foundry" or "FoundryVTT") is... well, a Virtual Tabletop. Importantly for our purposes it is a quality VTT with support for almost endless customization via 3rd party plugins, which Foundry calls "modules". There are several resources available online for how to write these modules, from Foundry's own documentation to the Foundry VTT Community Wiki and the League of Extraordinary FoundryVTT Developers on GitHub (henceforth abbreviated to LoEFD). Even so, there's a not-insignificant learning curve to go from nothing to a working module. We hope this post can serve as a resource to not just get you up and running with a simple module, but to explain how each part works - from the code to the build process - so you are well equipped to expand beyond these basics.
Prerequisites
This post will deal with moderately technical topics, so for the sake of brevity we will assume you have some familiarity with web development: JavaScript, HTML, CSS, and so on. If you want to follow along at home we also assume you have Node.js 16 or newer and Yarn available on your system.
At the time of writing, Foundry version 10 has just been released. If you have Foundry version 11 or newer installed because you're reading this in the future, some details might be out of date.
TL;DR
If you don't care to see the entire process, jump down to the conclusion for a summary, some quick tips for Foundry module development, and a link to the final template repo on our GitHub.
Let's Write A Module
Foundry includes an API for creating Modules, which can alter the behavior of the program in various ways. A module might simply provide translations for an otherwise unsupported language, or it could alter how core parts of the VTT behave. Whatever its functionality, the starting point for any module is its manifest file, module.json. The Foundry documentation describes this file and what its various fields mean. According to those docs, the only required fields are id, title, description, and version. However, you should probably include contacts and compatibility as well. With all those fields, your manifest might look something like this:
{
 "id": "foundry-ts-module",
 "title": "Foundry TS",
 "description": "A simple module using TypeScript",
 "authors": [
   {
     "name": "Josh Matthews",
     "email": "josh@bringingfire.com"
   }
 ],
 "version": "1.0.0",
 "compatibility": {
   "minimum": "9",
   "verified": "10"
 }
}
If you were to create a zip archive with just this file it would probably import into Foundry as a valid module, but it wouldn't actually do anything. Let's see how to add some functionality starting with the most interesting option: scripts.
Adding TypeScript
The most powerful tool at our disposal for customizing Foundry is its scripting API, which uses the JavaScript programming language. Now, modern JavaScript is a fine language but it is also possible to use many other languages that compile (or transpile) to JavaScript. For our module we will use TypeScript, which takes JavaScript's syntax and adds static typing with powerful type inference. Why are we jumping through hoops just to get static typing? Two main reasons:
- Static analysis tools such as IntelliSense will generally produce better results as a result of having static type data available.
- Static typing moves a large class of errors from run time to compile time. In other words, these errors will now occur when you are developing your application, instead of when your users might be using it.
So we want to use TypeScript but Foundry only understands JavaScript, which means we'll need a build process to handle the TS → JS compilation. For this we'll use the official TypeScript compiler + Vite to bundle the resulting output. Strictly speaking we don't need a bundler but using one provides a few additional benefits:
- The final module will be smaller. The size reduction will be more significant for complex modules with many lines of code and external dependencies, but even for small modules it's nice to avoid wasting bandwidth
- Vite has access to a large plugin ecosystem between its own plugins + compatibility with plugins for the popular Rollup bundler. We'll use some of those plugins later
- Vite has a powerful development server that we can set up as a proxy to Foundry to provide live reload as we work on our module. How to do so is beyond the scope of this tutorial, but you can find instructions here
First let's install some additional dependencies:
yarn add -D typescript vite rollup-plugin-copy @league-of-foundry-developers/foundry-vtt-typesThen we need to configure both the TypeScript compiler and Vite. We'll configure typescript first, which is done through the configuration file tsconfig.json. For the most part we'll use the default settings you would get with a new Vite project from vite-create. The most important bits are:
include: Tell the compiler where to look for the typescript files we'll be writingmodule: Use ESModules in the compiled code, which Vite needs for its part of the build processmoduleResolution: We want to be able to install and use modules from npm, so we'll use Node.js style module resolution to make importing fromnode_modulesworksourceMap: Include source maps in the output to make debugging easier. We can turn this off or just delete the source maps when shipping the module to reduce its sizetypes: Use the Foundry type definitions we installed from the LoEFD
Here are the full contents of the file:
{
 "compilerOptions": {
   "types": [
     "@league-of-foundry-developers/foundry-vtt-types",
   ],
   "target": "ESNext",
   "useDefineForClassFields": true,
   "module": "ESNext",
   "lib": [
     "ESNext",
     "DOM"
   ],
   "moduleResolution": "Node",
   "strict": true,
   "sourceMap": true,
   "resolveJsonModule": true,
   "isolatedModules": false,
   "esModuleInterop": true,
   "noEmit": true,
   "noUnusedLocals": true,
   "noUnusedParameters": true,
   "noImplicitReturns": true,
   "noImplicitOverride": true,
   "noImplicitAny": true,
   "skipLibCheck": true
 },
 "include": [
   "src"
 ]
}
Next we need to configure Vite to create our final output. This needs to include the compiled TypeScript, plus our module manifest. We'll configure the build option to bundle the code at src/ts/module.ts + all its dependencies and write that output to dist/scripts/module.js. We'll also use a Rollup plugin to copy the contents of module.json to dist.
Here's the result:
import copy from "rollup-plugin-copy";
import { defineConfig } from "vite";

export default defineConfig({
 build: {
   sourcemap: true,
   rollupOptions: {
     input: "src/ts/module.ts",
     output: {
       dir: undefined,
       file: "dist/scripts/module.js",
       format: "es",
     },
   },
 },
 plugins: [
   copy({
     targets: [{ src: "src/module.json", dest: "dist" }],
     hook: "writeBundle",
   }),
 ],
});
Almost done, let's finally create our script
Hooks.once("init", () => {
 console.log("Hello world!");
});
Here we see the first use of a Foundry API: That global Hooks object is provided by Foundry and gives us a way to execute code during specific events. In this case our code will run only once when the game initializes. You can read more about the hooks system in Foundry's documentation.
Now we just need to tell Foundry to load our script. We do this by adding a new field, esmodules, which contains the path to the compiled script output by TypeScript and Vite:
{
 "id": "foundry-ts-module",
 "title": "Foundry TS",
 "description": "A simple module using Typescript",
 "authors": [
   {
     "name": "Josh Matthews",
     "email": "josh@bringingfire.com"
   }
 ],
 "version": "1.0.0",
 "compatibility": {
   "minimum": "9",
   "verified": "10"
 },
 "esmodules": ["scripts/module.js"]
}
Speaking of TypeScript and Vite, we'll be invoking those programs a lot during development as we make changes to our code. Let's add a script to our package.json to make that easier:
{
 "name": "foundry-module-ts",
 "version": "1.0.0",
 "description": "A template project for FoundryVTT modules using TypeScript",
 "license": "MIT",
 "private": true,
 "scripts": {
   "build": "tsc && vite build"
 },
 "devDependencies": {
   "@league-of-foundry-developers/foundry-vtt-types": "^9.280.0",
   "rollup-plugin-copy": "^3.4.0",
   "typescript": "^4.8.2",
   "vite": "^3.1.0"
 }
}
Finally, we can run yarn build. This should create a directory called dist with several files:
module.json- an exact copy ofsrc/module.jsonscripts/module.js- our compiled codescripts/module.js.map- a source map of our compiled code so we can still use a debugger
Now that we have what is probably a working module we'll want to test it in Foundry. We can manually install our module by copying it into Foundry's modules directory, the location of which depends on your operating system:
- For Windows:
C:\Users<YOUR USER>\AppData\Local\FoundryVTT\Data\modules - For macOS:
$HOME/Library/Application Support/FoundryVTT/Data/modules
An even easier way to test is to just symlink the dist directory into the Foundry modules directory. On macOS, the command is:
ln -s $PWD/dist $HOME/Library/Application\ Support/FoundryVTT/Data/modules/foundry-module-tsTo create a symlink on Windows you'll first have to enable developer mode. Once that's done you can create the symlink in PowerShell with the following command:
New-Item -ItemType SymbolicLink -Target "$(pwd)\dist" -Path "$env:LOCALAPPDATA\FoundryVTT\Data\modules\foundry-module-ts"Note that the name of the directory or symlink we create must match the id specified in our manifest file.
With that all out of the way, let's fire up Foundry and try it out! Before launching a world, we should be able to see our module under the "Add-on Modules" tab:

Great. Now we can enable our module in a world:
- Load an existing world or create a new one to test with
- Join the game as the GM
- In the sidebar navigate to "Game Settings" → "Manage Modules"
- Check the box next to our module in the window that opens
- Click "Save Module Settings"
- Click "Yes" in the dialogue that opens asking if we want to reload now

With that the world should reload with our module loaded and... nothing happens. At least not that we can see. Open the developer tools by pressing F12 on Windows or Command+Option-I on macOS, then navigate to the "Console" tab. There, buried among various other logs from Foundry, we should see our output:
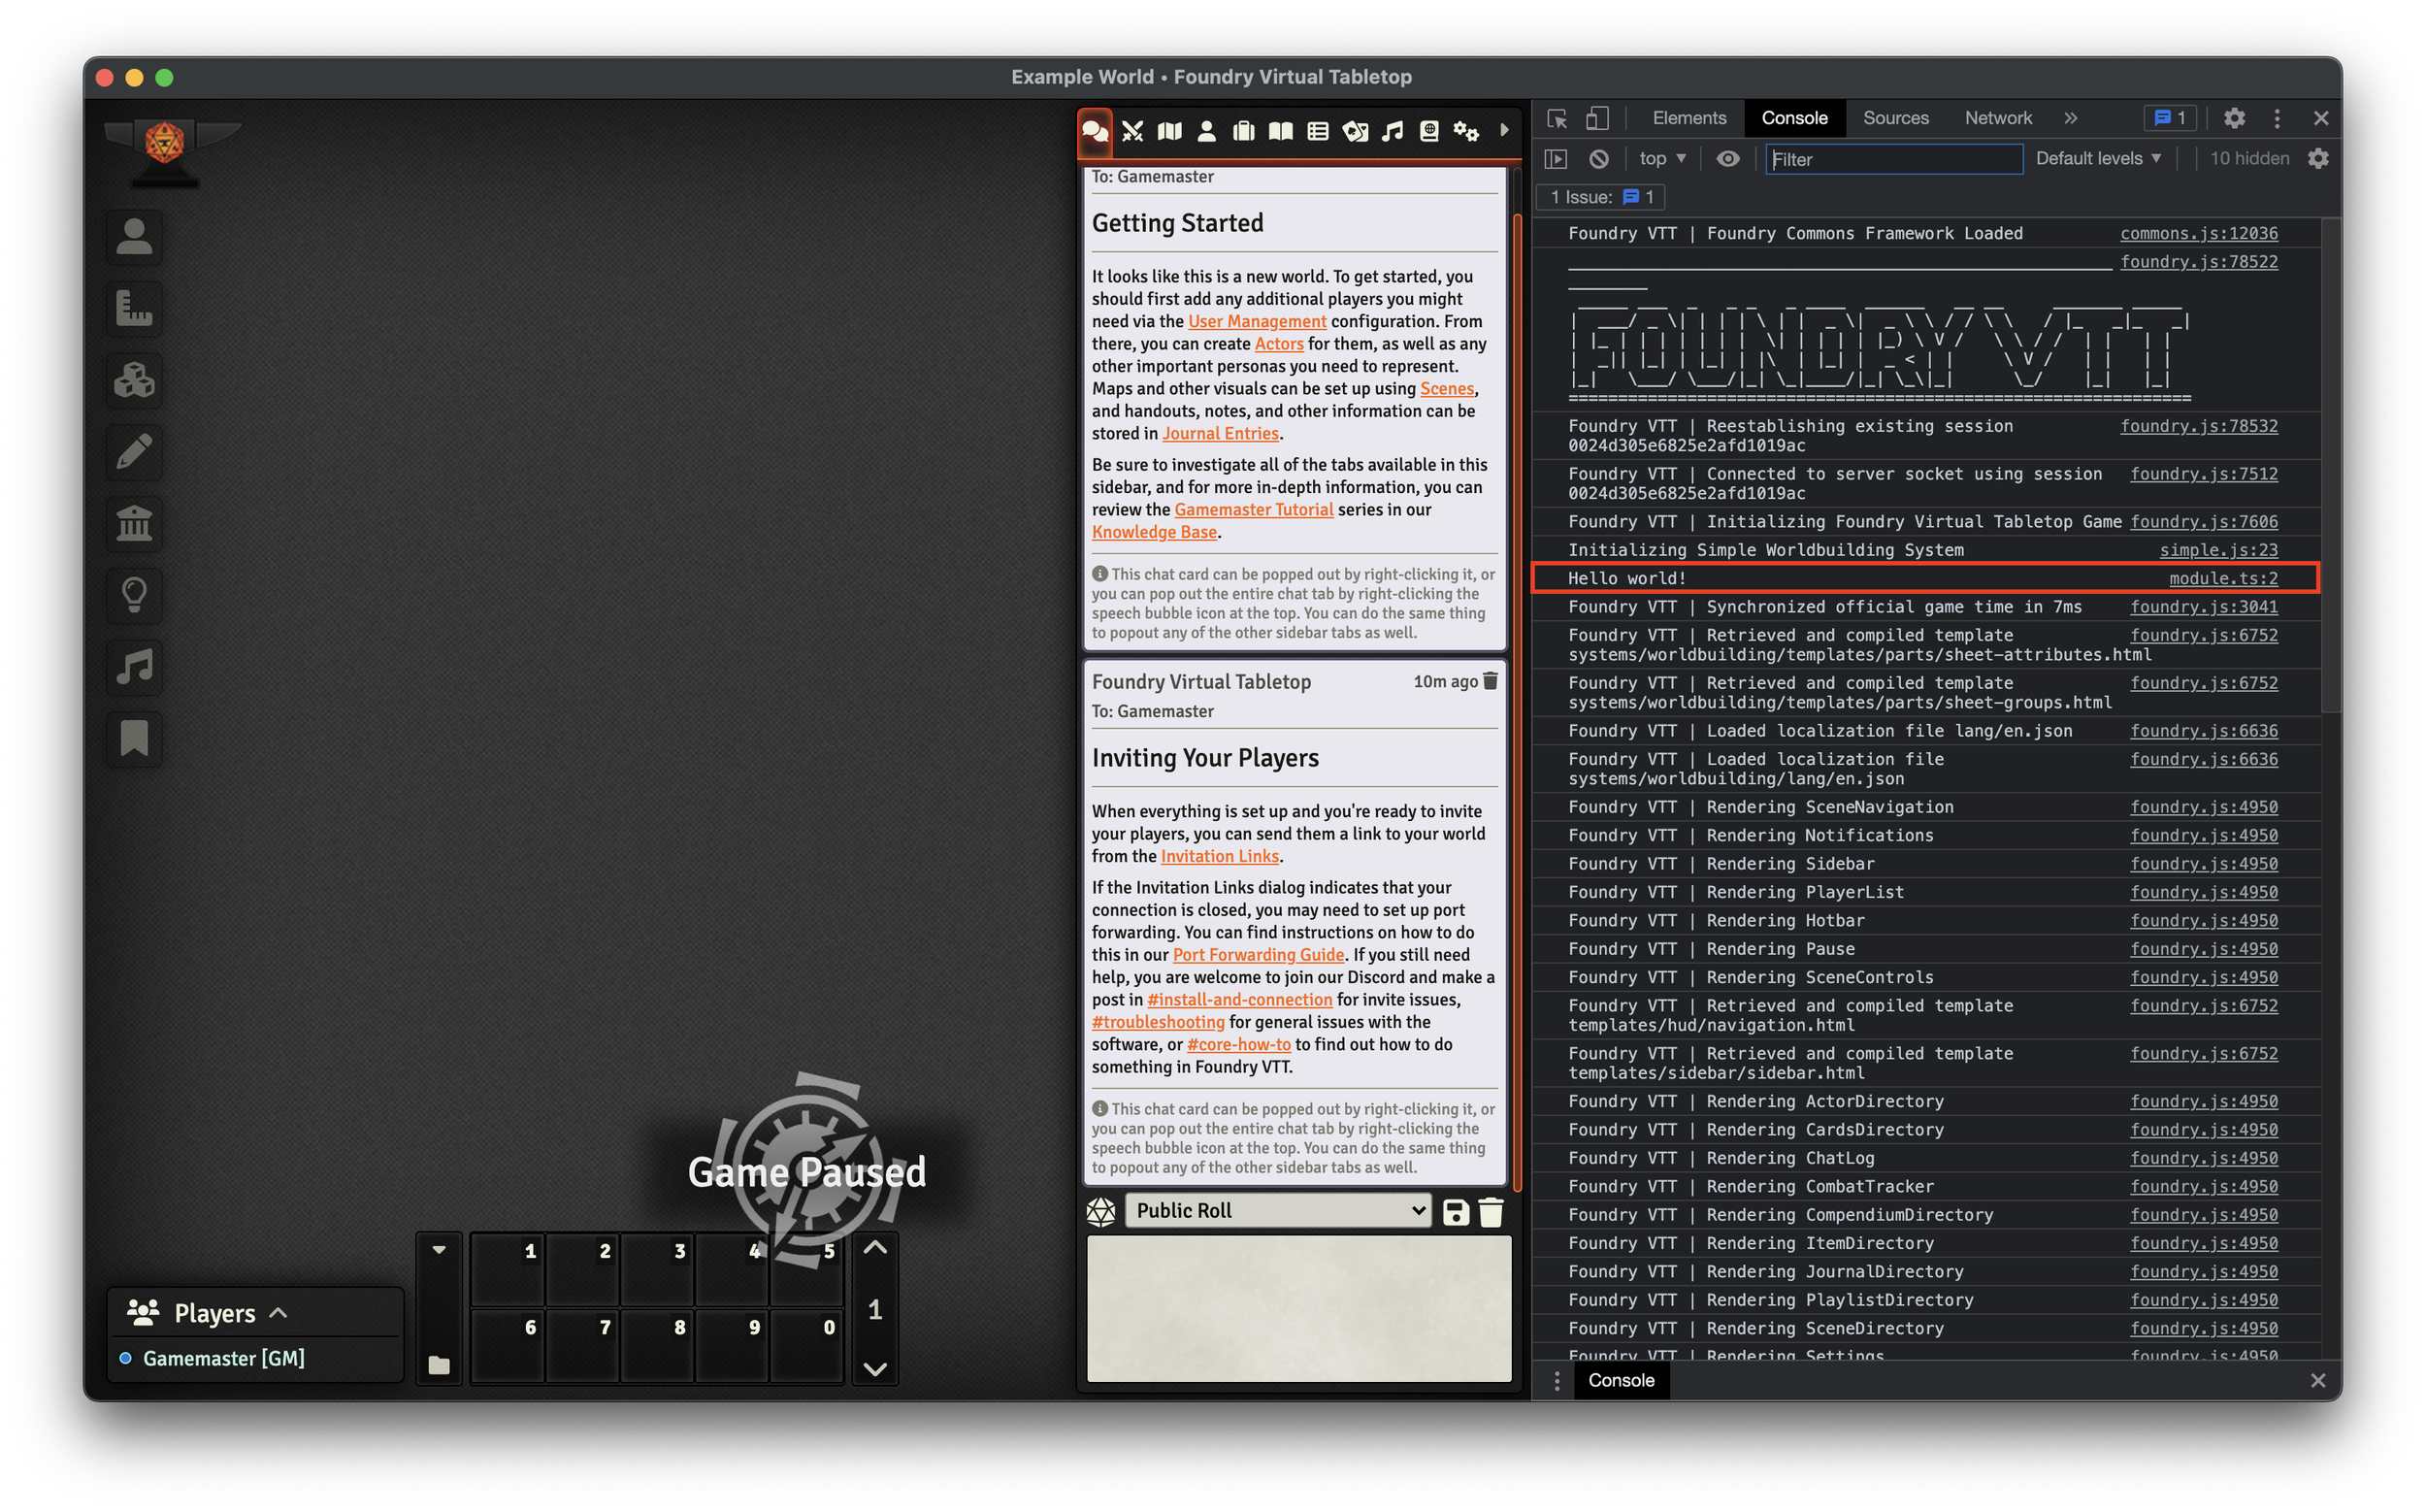
Now, having successfully printed "Hello World!" to the console, we can declare victory and add "Foundry Module Development" to our resumes. But just for fun, let's continue and see how we can add a bit more functionality.
Rendering Applications
One of the basic ways Foundry provides to show UI to users is through what it calls "applications": those floating windows it uses to show you settings, journal entries, etc. We'll create our own application to display random dog photos from the Dog API. To make this work, we'll need to create a few things:
- A class that extends the
Applicationclass provided by Foundry. - A template for the application to render.
- A way for the user to open our new application.
First we'll create our application class, and to keep things organized let's put it in its own file at src/ts/apps/dogBrowser.ts. For now we will just extend one method, defaultOptions, and add more logic later on.
import { id as moduleId } from "../../module.json";

export default class DogBrowser extends Application {
 static override get defaultOptions(): ApplicationOptions {
   return foundry.utils.mergeObject(super.defaultOptions, {
     id: "dog-browser",
     title: "Dog Browser",
     template: `modules/${moduleId}/templates/dogs.hbs`,
     width: 720,
     height: 720,
   }) as ApplicationOptions;
 }
}
This is the bare minimum we need to specify to render the application. Notice that the path to our template file depends on the module id, so we just import that from the manifest file. Also notice that we haven't created that template yet, so let's do so now. We're not rendering anything dynamic yet, so our template is just a static HTML fragment:
<section>
 <header class="flex-header">
   <h1>
     Dog Browser
   </h1>
   <button
     type="button"
     class="module-control"
     title="Fetch random dog photo"
     data-action="randomize-dog"
   >
     <i class="fas fa-random fa-fw"></i>
   </button>
 </header>
</section>
<section>
 <p>
   🐶
 </p>
</section>
We also need to configure Vite to include our templates in the output using the already installed copy plugin:
import copy from "rollup-plugin-copy";
import { defineConfig } from "vite";

export default defineConfig({
 build: {
   sourcemap: true,
   rollupOptions: {
     input: "src/ts/module.ts",
     output: {
       dir: undefined,
       file: "dist/scripts/module.js",
       format: "es",
     },
   },
 },
 plugins: [
   copy({
     targets: [
       { src: "src/module.json", dest: "dist" },
       { src: "src/templates", dest: "dist" },
     ],
     hook: "writeBundle",
   }),
 ],
});
Almost done, now we can instantiate our application and give the user a way to access it. First, instantiation:
import { ModuleData } from "@league-of-foundry-developers/foundry-vtt-types/src/foundry/common/packages.mjs";
import { id as moduleId } from "../module.json";
import DogBrowser from "./apps/dogBrowser";

interface MyModule extends Game.ModuleData<ModuleData> {
 dogBrowser: DogBrowser;
}

let module: MyModule;

Hooks.once("init", () => {
 console.log(`Initializing ${moduleId}`);

 module = (game as Game).modules.get(moduleId) as MyModule;
 module.dogBrowser = new DogBrowser();
});
Here we're replacing our "Hello World!" code with some one-time setup to run when the game first initializes. For this setup we're fetching the instance of our module from the global game variable provided by Foundry and adding an instance of our DogBrowser application to it. We can then access our module and application through that same variable in other hooks. We'll do just that to add a button to the actors directory so users can summon our application:
// Existing code left out for brevity

Hooks.on("renderActorDirectory", (_: Application, html: JQuery) => {
 const button = $(
   `<button class="cc-sidebar-button" type="button">🐶</button>`
 );
 button.on("click", () => {
   module.dogBrowser.render(true);
 });
 html.find(".directory-header .action-buttons").append(button);
});
If we rebuild our application and refresh Foundry we should see a new button at the top of the actors directory, and if we click it:
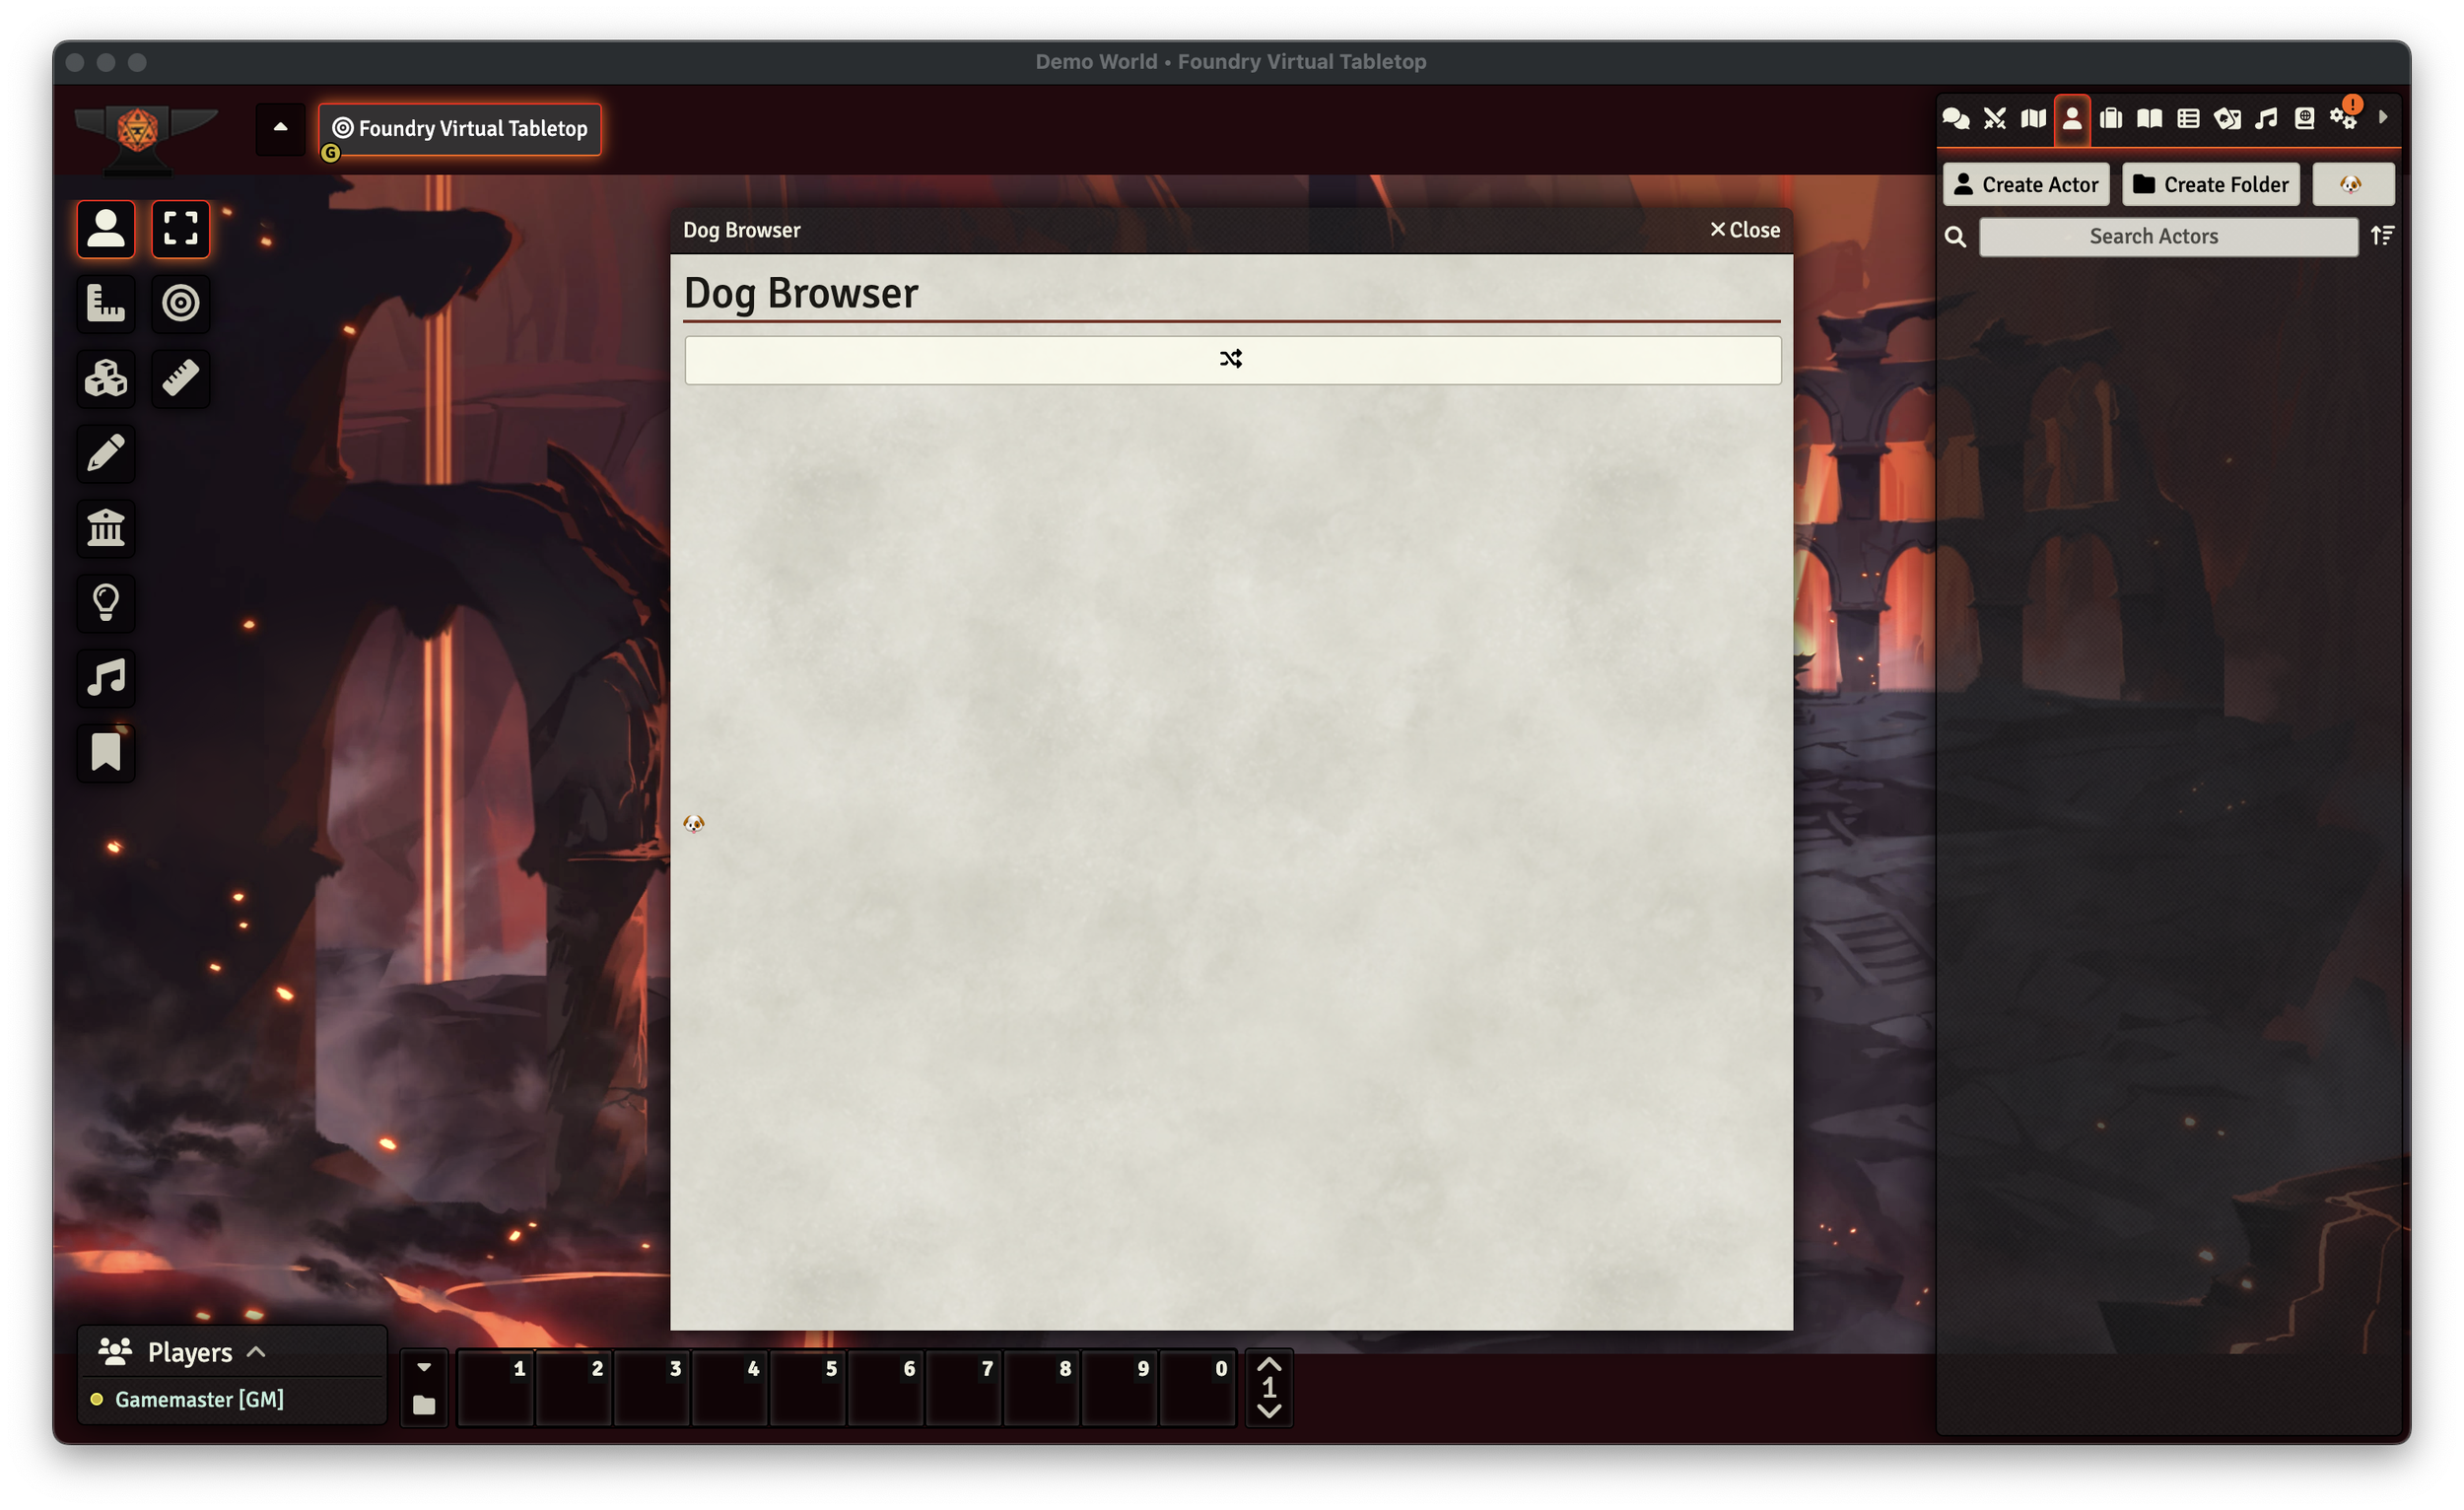
Neat, but it doesn't do anything yet. We need to fetch (GET IT?) an image URL from the dog API and render it in the UI. First let's just get that URL:
export default class DogBrowser extends Application {
 private imageUrl?: String;

 // Unmodified code excluded for brevity

 override getData() {
   return {
     imageUrl: this.imageUrl,
   };
 }

 override activateListeners(html: JQuery<HTMLElement>): void {
   console.log("activating listeners");
   super.activateListeners(html);
   html
     .find("button.module-control")
     .on("click", this._onClickControlButton.bind(this));
 }

 async _onClickControlButton(event: JQuery.TriggeredEvent): Promise<void> {
   event.preventDefault();
   const button = event.target as HTMLElement;
   const action = button.dataset.action;

   switch (action) {
     case "randomize-dog":
       this._randomizeDog();
       break;
   }
 }

 async _randomizeDog() {
   const response = await fetch("https://dog.ceo/api/breeds/image/random");
   if (response.status != 200) {
     ui.notifications?.error(
       `Unexpected response fetching new dog image: ${response.status}: ${response.statusText}`
     );
     return;
   }
   this.imageUrl = (await response.json()).message;
   this.render();
 }
}
There's a lot happening here, so let's break it down:
private imageUrl?: String;: Here we're defining a variable on our application to keep track of the current image URL we want to display, if any.override getData() {...}: This method is how we provide data to our handlebars template. We'll see how to access it in the template in just a moment.override activateListeners(html: JQuery<HTMLElement>): void {...}: This hook is called when our application is first rendered. As the name implies, this is where we can register event listeners on our rendered HTML. In this case we're registering a single function,_onClickControlButton, for anybuttonelement with classmodule-control. Which brings us to...async _onClickControlButton(event: JQuery.TriggeredEvent): Promise<void> {...}: Here we receive any events from clicks on our buttons and call the appropriate handler based off theirdata-actionproperty.async _randomizeDog() {...}: Finally we get to the API call, where we fetch (DO. YOU. GET IT?) the URL of a random dog picture from the API, do some simple and not particularly robust error handling if we get an unexpected response, and update ourimageUrlinstance variable on success. Finally, we callrenderto tell Foundry to re-render our application with the new data.
All this seems fine, but it won't work just yet. We still need to update our template to use the the newly available data. Foundry uses Handlebars for templates. We can use a simple conditional block to render an image if we have a URL, or the dog emoji placeholder if not:
<section>
 <header>
   <h1>
     Dog Browser
   </h1>
   <button
     type="button"
     class="module-control"
     title="Fetch random dog photo"
     data-action="randomize-dog"
   >
     <i class="fas fa-random fa-fw"></i>
   </button>
 </header>
</section>
<section>
 {{#if this.imageUrl}}
   <img
     src="{{this.imageUrl}}"
     alt="Image of a random dog"
   />
 {{else}}
   <p>
     🐶
   </p>
 {{/if}}
</section>
Finally we can reload foundry, press the shuffle button in our app, and...

Perfect.
We now have an application that can take input, communicate with a remote API, and display feedback to the user. That's pretty good, but let's see how we can make it look a bit nicer with styles.
Styles
Our application looks okay with just Foundry's default styles applied, but in any real module you'll want to have more control over how your content is displayed. Inline styles could work but are terrible to maintain so we'll add a custom stylesheet to our module instead, and since we already have Vite set up we can easily use SCSS to write it.
First we create our stylesheet. We won't do anything too fancy here, just make the placeholder emoji larger and clean up the rendered image to remove its border and make it fit inside its container.
.window-app .window-content section.module-dog-picture-container {
 flex: 100;
 display: flex;
 justify-content: center;
 align-content: center;
 margin-top: 10px;

 .module-dog-placeholder {
     font-size: 200px;
   }

 img.module-dog-image {
   object-fit: contain;
   border: none;
 }
}
Now we need Vite to compile this into normal CSS, and for that we'll need a plugin:
yarn add -D rollup-plugin-scssWith that we can update our Vite config:
import copy from "rollup-plugin-copy";
import scss from "rollup-plugin-scss";
import { defineConfig } from "vite";

export default defineConfig({
 build: {
   sourcemap: true,
   rollupOptions: {
     input: "src/ts/module.ts",
     output: {
       dir: undefined,
       file: "dist/scripts/module.js",
       format: "es",
     },
   },
 },
 plugins: [
   scss({
     output: "dist/style.css",
     sourceMap: true,
     watch: ["src/styles/*.scss"],
   }),
   copy({
     targets: [
       { src: "src/module.json", dest: "dist" },
       { src: "src/templates", dest: "dist" },
     ],
     hook: "writeBundle",
   }),
 ],
});
One quirk of using Vite is it will try to eliminate any unused code, and right now it thinks our styles are unused. We can easily work around this by just importing the stylesheet into our module's script entry point:
import "../styles/style.scss";

// Rest of file excluded for brevity
And of course we need to tell Foundry about our new stylesheet by adding it to our module manifest, in this case under the styles key:
{
 "id": "foundry-ts-module",
 "title": "Foundry TS",
 "description": "A simple module using TypeScript",
 "authors": [
   {
     "name": "Josh Matthews",
     "email": "josh@bringingfire.com"
   }
 ],
 "version": "1.0.0",
 "compatibility": {
   "minimum": "9",
   "verified": "10"
 },
 "esmodules": ["scripts/module.js"],
 "styles": ["style.css"]
}
Now if we rebuild our module and restart Foundry, we should see that the placeholder emoji is centered and much bigger, and the images size themselves to the available space better.
Manifest Revisited + Automated Releases
We'll leave the module as-is for now and turn to a different problem: publishing your module. We want to make our module available to other Foundry users, and they should be able to install our module just by entering our module manifest URL in this box:

To make this happen, we will need to make several changes:
- Our manifest and a zip archive containing our built module will need to be hosted somewhere publicly accessible on the internet
- Our manifest needs two new fields,
manifestanddownload, which point to the public URLs for itself and the zip archive respectively
As you may be able to tell, this will require updating the manifest each time we publish a new release. Specifically, the version number will need to be increased, so that Foundry can auto-update our module, and the download field will need to change to point to the zip archive for each version. Rather than update these values by hand, which makes human error a possibility and is just annoying busy-work, we'll update our Vite build to handle all this for us. First, we remove our manifest file from the configuration for the copy plugin:
// ...

copy({
     targets: [
       { src: "src/templates", dest: "dist" },
     ],
     hook: "writeBundle",
})

// ...
Next, we'll write our own Vite plugin to handle copying and updating the manifest. Don't worry, it's not complicated. First, some new imports:
import * as fsPromises from "fs/promises";
import copy from "rollup-plugin-copy";
import scss from "rollup-plugin-scss";
import { defineConfig, Plugin } from "vite";
The fsPromises import is how we will read and write files, and the Plugin import defines the interface for Vite plugins. Let's implement that interface with a simple plugin! For now we will just read in our module manifest and write it back out to its output location:
function updateModuleManifestPlugin(): Plugin {
 return {
   name: "update-module-manifest",
   async writeBundle(): Promise<void> {
     const manifestContents: string = await fsPromises.readFile(
       "src/module.json",
       "utf-8"
     );
     const manifestJson = JSON.parse(manifestContents) as Record<
       string,
       unknown
     >;
     await fsPromises.writeFile(
       "dist/module.json",
       JSON.stringify(manifestJson, null, 4)
     );
   },
 };
}
Re-run your build and you should see your manifest file still appear in the output. But we don't just want to re-implement copying the file, we need to add fields to the manifest. We'll start with just the version number. To get that information into the build process as a parameter, let's read it from the environment and then add it into our module manifest output:
function updateModuleManifestPlugin(): Plugin {
 return {
   name: "update-module-manifest",
   async writeBundle(): Promise<void> {
     const moduleVersion = process.env.MODULE_VERSION;
     const manifestContents: string = await fsPromises.readFile(
       "src/module.json",
       "utf-8"
     );
     const manifestJson = JSON.parse(manifestContents) as Record<
       string,
       unknown
     >;

     if (moduleVersion) {
       manifestContents["version"] = moduleVersion;
     }

     await fsPromises.writeFile(
       "dist/module.json",
       JSON.stringify(manifestJson, null, 4)
     );
   },
 };
}
Run your build again, but this time specifying a version via the environment:
# Command specific to unix like shells
MODULE_VERSION='2.3.5' yarn build
Now when you check the output in dist you should see the new version field set to the specified value. Almost done, we just need the URL where the manifest and zip archive will be hosted. We'll be using GitHub releases to host our module, so we can construct these URLs with that in mind:
function updateModuleManifestPlugin(): Plugin {
 return {
   name: "update-module-manifest",
   async writeBundle(): Promise<void> {
     const moduleVersion = process.env.MODULE_VERSION;
     const githubProject = process.env.GH_PROJECT;
     const githubTag = process.env.GH_TAG;
     const manifestContents: string = await fsPromises.readFile(
       "src/module.json",
       "utf-8"
     );
     const manifestJson = JSON.parse(manifestContents) as Record<
       string,
       unknown
     >;

     if (moduleVersion) {
       manifestJson["version"] = moduleVersion;
     }
     if (githubProject) {
       const baseUrl = `https://github.com/${githubProject}/releases`;
       manifestJson["manifest"] = `${baseUrl}/latest/download/module.json`;
       if (githubTag) {
         manifestJson[
           "download"
         ] = `${baseUrl}/download/${githubTag}/module.zip`;
       }
     }

     await fsPromises.writeFile(
       "dist/module.json",
       JSON.stringify(manifestJson, null, 4)
     );
   },
 };
}
All done with Vite, now we just need to set up GitHub to build and publish our releases for us. GitHub Actions allows us to define automation workflows with YAML files in our repo. We will define a single workflow, called Publish release, which will run when we trigger a release. It will clone our repository, build our module, and upload the files so users can download them. Here is the workflow:
name: Publish release

on:
 release:
   types: [published]

jobs:
 build:
   runs-on: ubuntu-latest
   steps:
     - name: Checkout
       uses: actions/checkout@v3

     - name: Setup node
       uses: actions/setup-node@v3
       with:
         node-version: 18

     - name: Install dependencies
       run: yarn

     - name: Extract tag version number
       id: get_version
       uses: battila7/get-version-action@v2

     - name: Run Vite build
       env:
         MODULE_VERSION: ${{steps.get_version.outputs.version-without-v}}
         GH_PROJECT: ${{github.repository}}
         GH_TAG: ${{github.event.release.tag_name}}
       run: yarn build

     - name: Create zip archive
       working-directory: dist
       run: zip -r ./module.zip module.json style.css scripts/ templates/ languages/

     - name: Update release with files
       id: create_version_release
       uses: ncipollo/release-action@v1
       with:
         allowUpdates: true # Set this to false if you want to prevent updating existing releases
         name: ${{ github.event.release.name }}
         draft: ${{ github.event.release.unpublished }}
         prerelease: ${{ github.event.release.prerelease }}
         token: ${{ secrets.GITHUB_TOKEN }}
         artifacts: "./dist/module.json, ./dist/module.zip"
         tag: ${{ github.event.release.tag_name }}
         body: ${{ github.event.release.body }}
And now we are truly done! To publish your module, just push it to a public GitHub repo. When you create a release with a tag in the form of a version number, such as v1.2.3, the workflow will run and upload your built module to the release. Your users can install the module using the URL https://github.com/<YOUR USERNAME>/<REPO NAME>/releases/latest/download/module.json and you easily publish updates without having to remember how to publish a release by hand each time.
Conclusion
We've now seen how to go from nothing, to code running in Foundry, to that code rendering things the user can interact with, and finally automating a way to release all that to your users. You should now have a working module and an understanding of the basics you need to go and start customizing Foundry with whatever functionality you might need. You can find a list of useful resources, including a repo template containing a version of the module from this post, in the resources section down below.
We would like thank Foundry for making a great tool that facilitates customization, as well as the maintainers of the Foundry VTT Community Wiki and the League of Extraordinary Foundry Developers, who maintain great resources to help the community realize the potential of that customization.
Resources
- Our Foundry module template
- Official Foundry module documentation:
- League of Extraordinary Foundry Developers Github organization
- Foundry VTT Community Wiki